Registration Guide
Ready to register?
If you're ready to go, you can register for classes during your registration period.
Register for Classes on WebSMARTHave questions?
Find answers to some common registration questions.
Preparing for Registration
Review Your Registration Appointment via WebSMART
- Go to WebSMART and login
- Choose Student Services to access your Student Records, then click on Registration
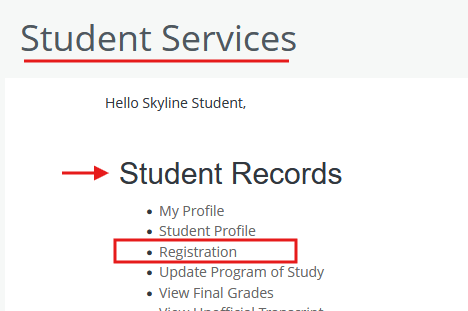
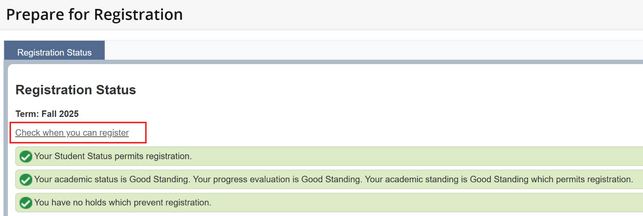
- Click on Prepare for Registration

- Select term and click Continue. This page will show your registration status
- Click on Check when you can register to display your registration date
Clear a Hold on Your Account
You will not be able to register for the following semester if a hold exists on your account.
Review the types of holds and steps to resolve them on the district's Registration Holds page.
Registration
Using WebSchedule to View Classes
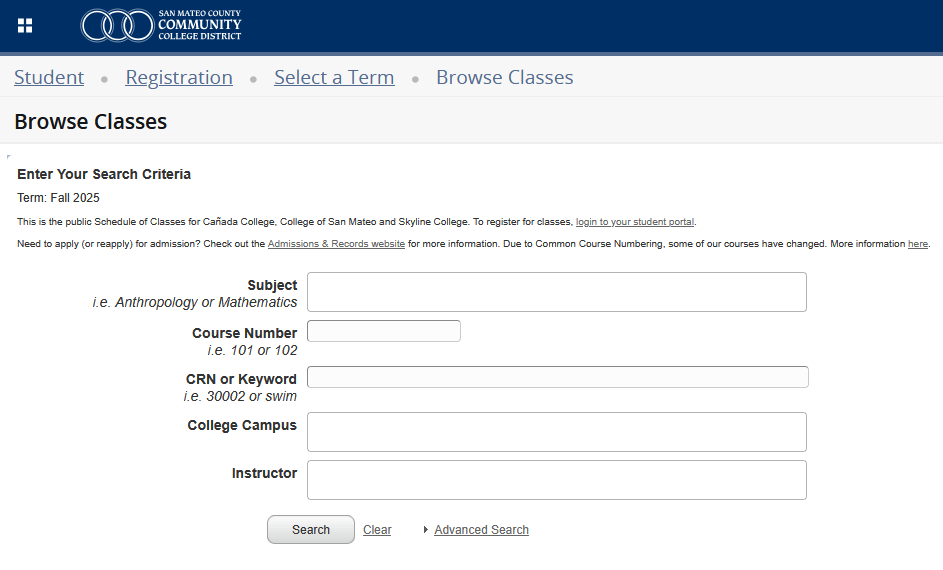
- Go to WebSchedule
- Select a Term
- Enter your search criteria: campus, subject, course number, etc. Watch our class search tips video for more information
- Click the search button to view results
- When you've found a class you want, go to WebSMART to register.
Registering for / Dropping Classes via WebSMART
- Go to WebSMART and login
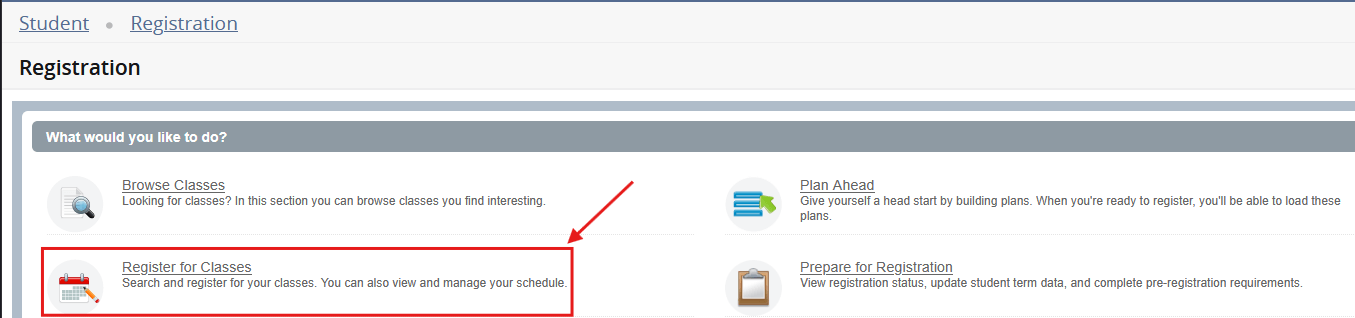
- Choose Student Services to access your Student Records, then click on Registration
- Click on Register for Classes, then Select a Term from the dropdown
- Search for the course you would like to register for
- Add course. A green "Registered" label will appear in the Status column if you successfully
add the course.
- If you get the green 'Registered' label, you have successfully registered for the
course.

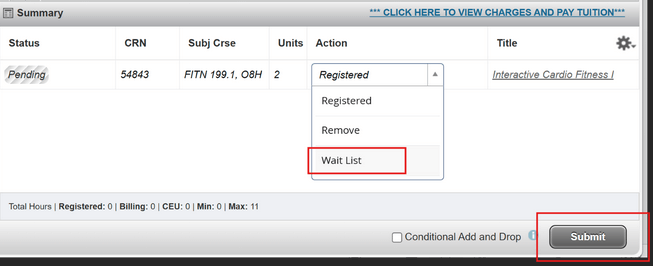
- If the course is full and waitlist is open, then your registration status will be
Pending. Select Wait List in the dropdown menu and click Submit to join the waitlist
- If you get the green 'Registered' label, you have successfully registered for the
course.
Wait List Sign-ups
- Go to WebSMART and login
- Choose Student Services to access your Student Records, then click on Registration
- Click on Register for Classes, then Select a Term from the dropdown
- Search for the course you would like to waitlist
- Add course. If the course is full and waitlist is open, then your registration status
will be Pending.
- Select Wait List in the dropdown menu and click Submit to join the waitlist
- Select Wait List in the dropdown menu and click Submit to join the waitlist
Check Wait List Position
- Go to WebSMART and login
- Choose Student Services to access your Student Records, then click on Registration
- Click on Register for Classes, then Select a Term from the dropdown
- Select the Plans tab underneath the page title "Register for Classes"

- Click the Schedule Details button for the course.
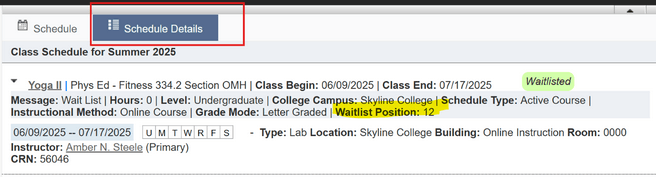
- Information about the course will display. Your waitlist position will be listed here
Wait List Notification & Registration
You can register for a waitlisted course if:
- You have received an authorization code to take the course, or
- You have received an email or text saying that you have gotten off the waitlist
If you've received an authorization code:
- Go to WebSMART and login
- Choose Student Services to access your Student Records, then click on Registration
- Choose Register for Classes
- Select a term from the dropdown and continue.
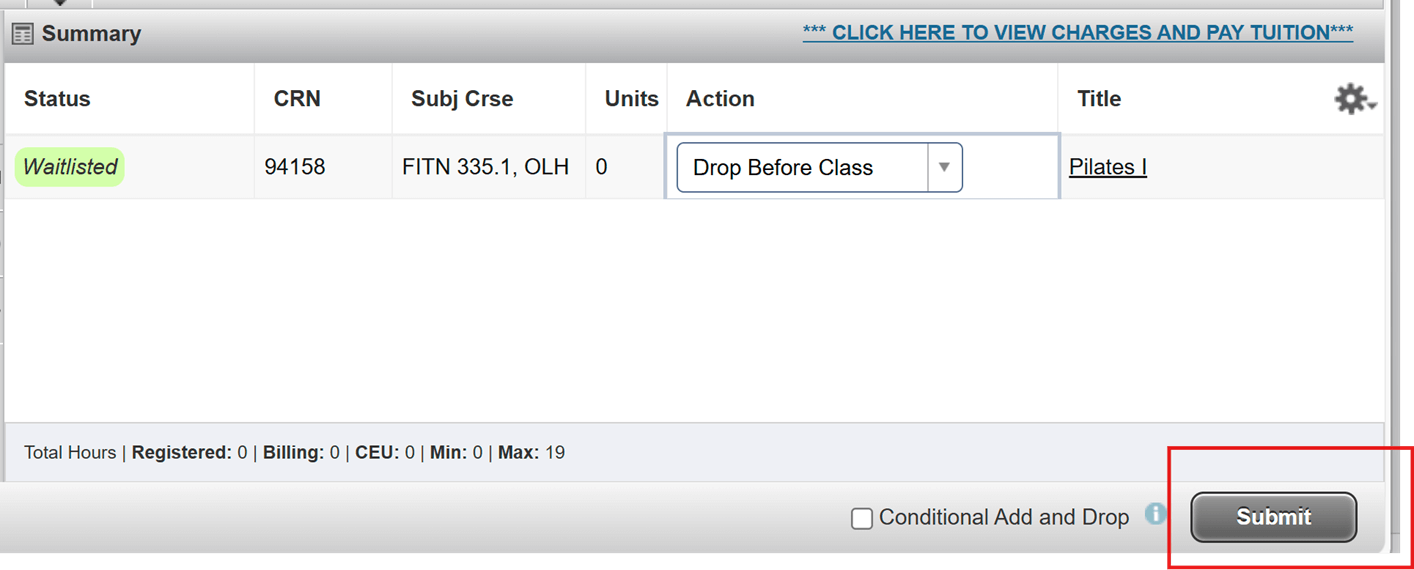
- In the course summary, you should see the waitlisted course.
- In the dropdown menu, select Drop Before Class and click Submit.
- Now, go back to Register for Classes and enter the CRN for the class.
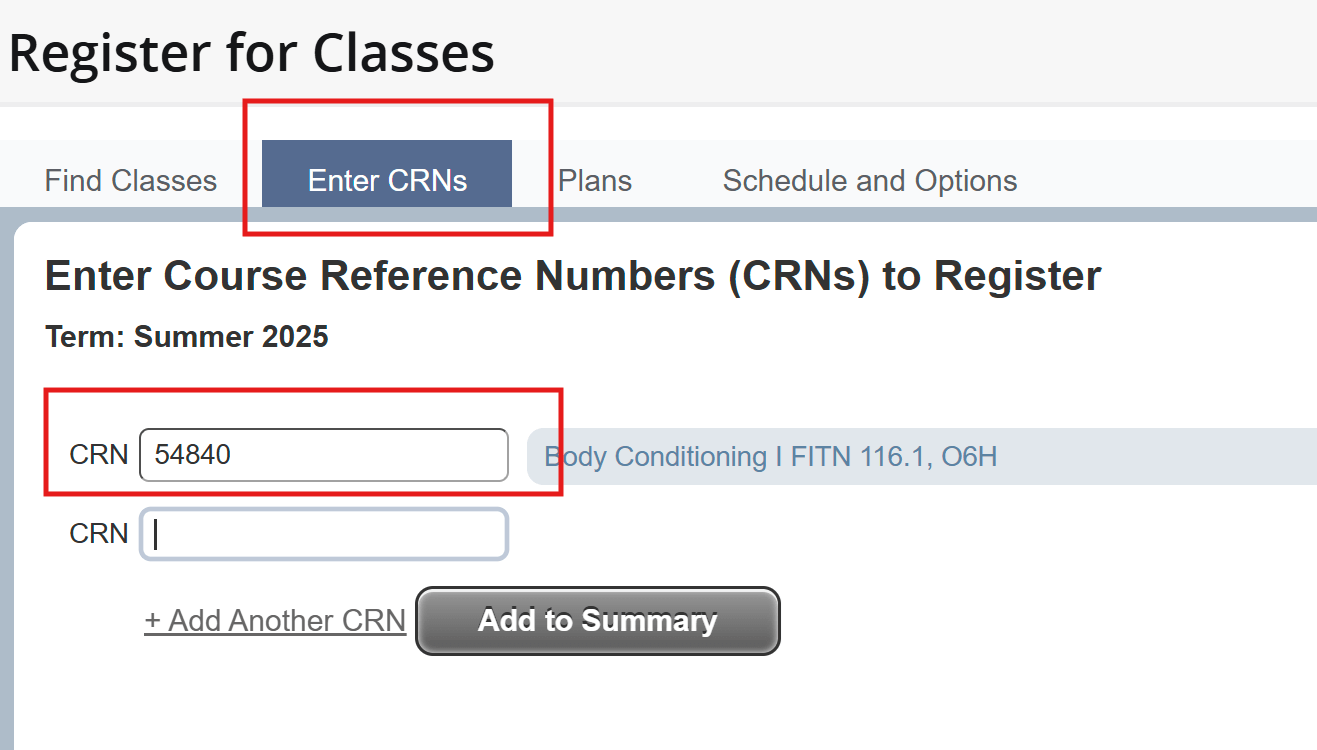
- Click on the Add to Summary button and a pop-up will appear to enter the authorization code.
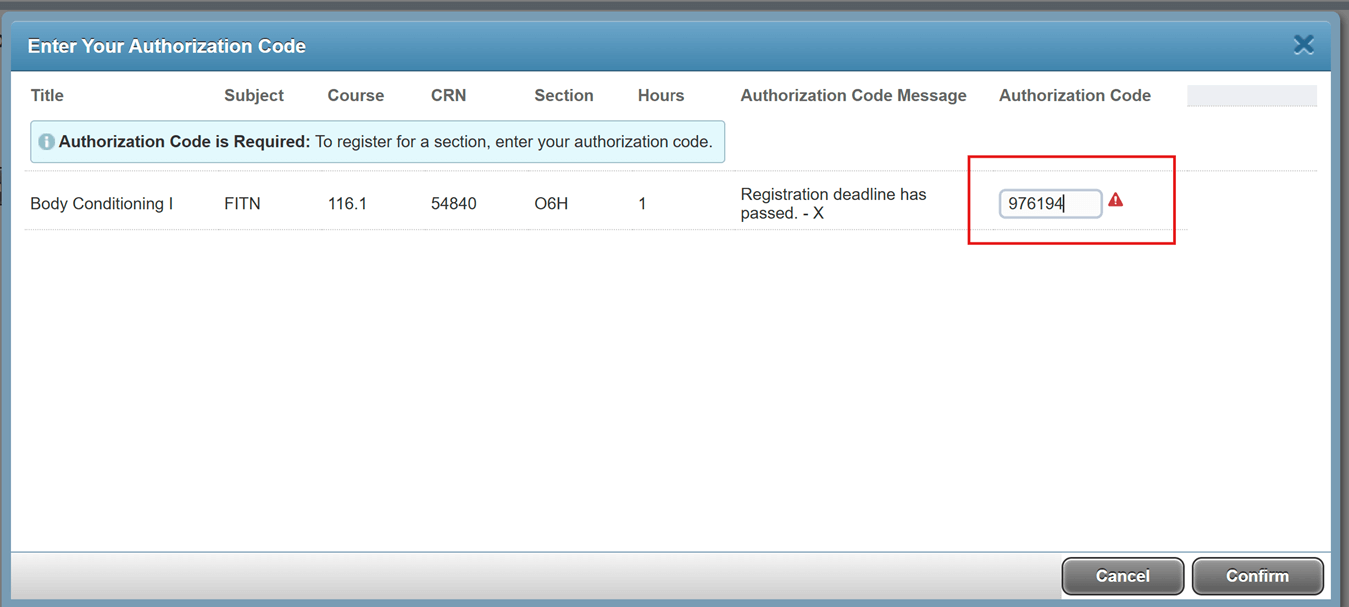
- Enter the authorization code and save your changes.
Wait List Notification & Registration
You can register for a waitlisted course if:
- You have received an authorization code to take the course, or
- You have received an email or text saying that you have gotten off the waitlist
If you've received an email/text to register:
- If space opens up in a class for which you are waitlisted, you will be notified by
email.
- You will also be notified by text message if you have signed up to receive non-emergency texts.
- You can now go to WebSMART and register for the course.
- You only have 24 hours from the time the email/text is sent to you to register for the class.
If you do not register for the class within 24 hours since the notification, your name will be removed from the waiting list.
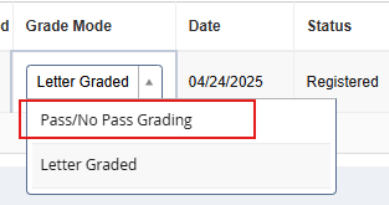
Change from Letter Grade to P/NP
- Go to WebSMART and login
- Choose Student Services to access your Student Records, then click on Registration
- Click on Register for Classes
- Click the Schedule and Options tab underneath the page title "Register for Classes"

- If the course has the P/NP option:
- In the Grade Mode column, click Letter Graded
- This will give you a dropdown list
- Select the preferred grade mode
- Click the Submit button at the bottom of the page to save your changes
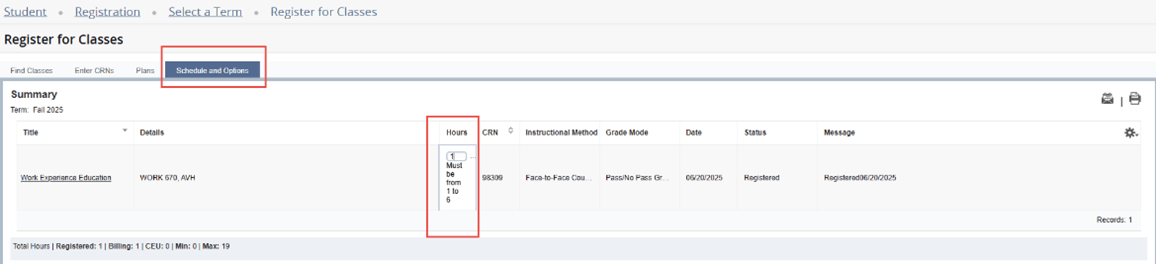
Change Units for Variable Unit Courses
- Go to WebSMART and login
- Choose Student Services to access your Student Records, then click on Registration
- Click on Register for Classes
- Click the Schedule and Options tab underneath the page title "Register for Classes"
- You will be able to update class units under "Hours"
Auditing a Class
Skyline College allows auditing of courses, with the exception of courses in programs that require special preparation and/or program admission on a limited basis. A student may audit a course only under the following circumstances:
- The student must have previously enrolled for credit for the maximum number of times allowed for the particular course.
- The instructor of record for the course must approve the student’s enrollment as an auditor.
- The student must be in good academic standing.
- If the course is offered for variable units, the student must enroll for the maximum number of units available.
- The student must enroll as an auditor immediately following the published late registration period and pay the auditing fee.
Students who wish to audit a course may enroll the week after the late registration period is concluded, though with the instructor’s permission they are able to attend the course from the first-class meeting. If you would like to audit a course, complete the Audit Course Request available on the Admissions & Records Forms page.
Fee Payment
Paying Your Class Fees via WebSMART
- Go to WebSMART and login
- Choose Student Services to access your Student Accounts, then click on Account Summary/Pay Now
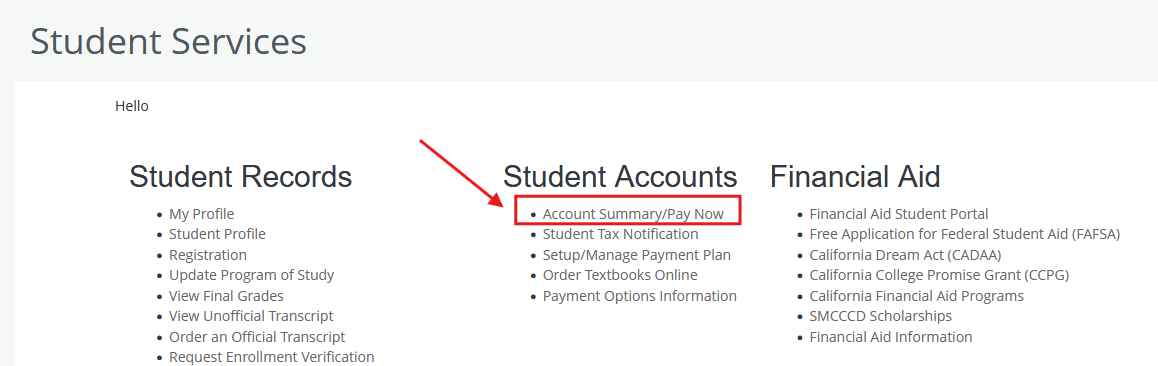
- Select from the dropdown to see your account summary as an overview, by term, or by
period
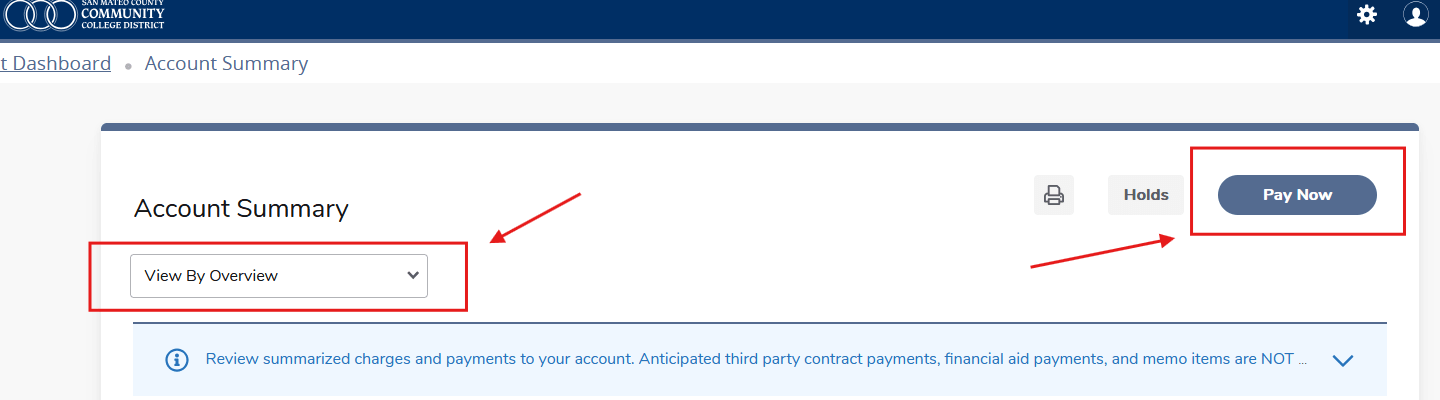
- Pay for a selected term
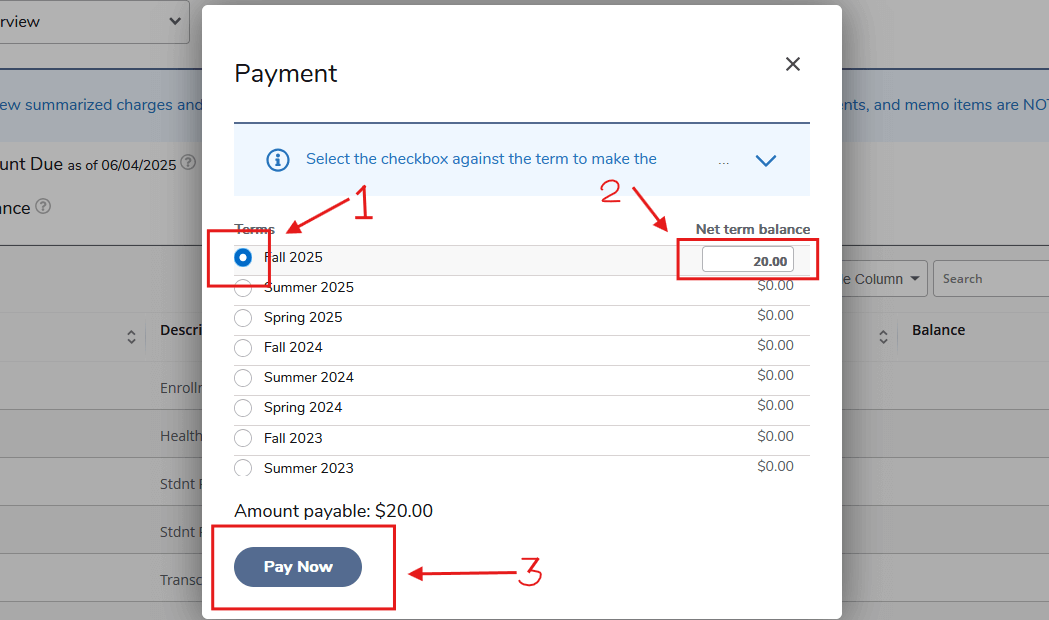
- Select the Pay Now button in the top right. In the pop-up, select the term you are paying for.
- In the row of the term you selected, input the amount you would like to pay.
- Click Pay Now and complete your payment
You will get dropped from your classes if you do not pay your fees on time.
Students who are unable to pay their fees should apply for federal financial aid through the Free Application for Federal Financial Aid (FAFSA), the California Dream Act (AB 540) or sign up for a payment plan that allows you to pay your fees over an extended period of time. For additional information on payment plan, visit the Cashier's Office in order to prevent being dropped from classes.
Registration Issues
Other problems with registering
- Students may find that they unable to register for classes. You can review common registration issues and steps to resolve on the district's Registration Errors page.